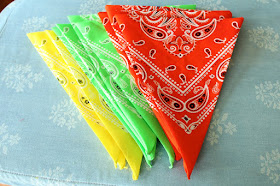
To make your own bunting, determine how many flags you want your bunting to have, divide by four, and purchase that number of bandanas in the colors of your choice. I wanted a 12-flag bunting so I bought three bandanas.
I had a very specific color scheme in mind—yellow, orange, green—and unfortunately my usual bandana source didn't have any of those colors, so I bought some instead at the craft store. They're not quite as nice of quality, either in color, the printing of the design, or the squareness of the bandana, but they served the purpose.

Step 1. Iron the bandanas.

Step 2. Cut them into quarters.
 For each bandana you started with, you'll end up with four equal squares.
Step 3. Place a bandana square on the ironing board in front of you, wrong side up, and turn it 45 degrees so that the two finished sides come to a point at the bottom and the two cut sides come to a point at the top. Fold the finished sides toward the center and press.
 Step 4. Open the sides back up and fold the top down even with the tops of the side folds and press (You could also cut the top off, but pressing seemed easier to me.)
Step 5. Fold the sides back in. Now you have a triangle.
 Repeat with the remaining bandana squares. So far no sew.
Now comes the time to put your bunting together. This is the only sewing part, although you could use pins, fabric tape, or glue. Double-fold bias tape would be ideal for the string part of the bunting (what is that? garland?), so that you can fold it over the raw edge at the top of the each flag. The craft store did not have any bias tape so I bought ribbon instead (a 5-yard spool). I thought I might be able fold the ribbon, but it was too narrow. It occurred to me belatedly that I could have bought two ribbons, one for the front and one for the back to give it a more finished edge on the back side, but I think it's fine how it is.
Step 5. Figure out how you want your flags spaced on the ribbon. I could probably have used math to do this, but instead I laid the ribbon out on the floor and lined the flags up in a pleasing arrangement. They ended up about 3 inches apart with about a foot-and-a-half or two feet of extra ribbon on each end. Pin flags in place and sew (or tape or glue).
 A few guests requested recipes from the dishes I made. Almost everything came from Rick Bayless's Mexico—One Plate at a Time cookbook (including the gorgeous flan M made with my help—a first time making flan for both of us and it came out perfect). I found a couple of recipes on his web page:
Chipotle chicken salad tacos
Mexican-style zucchini tacos
One dish I did NOT use a recipe for was the cheese enchiladas—for those I just rolled up grated cheddar in corn tortillas, laid them in a baking dish, topped with a magic secret ingredient, sprinkled on more cheese and baked until melty and bubbly.

Andrea, thank you for sharing the recipes! I have seen that top secret recipe in stores and was wondering how it was. Good to know! Cute bunting too.
ReplyDeleteHi Meredith, I just discovered your comment in my "awaiting moderation" folder! Oops. Hope you've given Frontera sauces a try. They are lifesavers for busy mamas (and I don't even get a kickback from the company)!
Delete